Saturday Surprise-Lemon Cake

I got up this morning and fancied baking something, but what? I didn’t want to go out and buy ingredients, so it would have to be something made with what I had in. A lemon drizzle-type cake then.

No, I don’t keep lemons in standardly, and this should probably be made with real lemon, but I always have a bottle of lemon juice in the fridge, and that’s my usual go-to for lemony things. The original recipe was given to me by a friend at work, quite a few years ago. It was her signature cake and always eagerly awaited when we had a ‘pot-luck’. I have, however, made a few amendments, especially the use of soft margarine and bottled lemon juice, to make this an everyday treat cake. The original cake calls for grated lemon zest in the cake mixture, which definitely gives a fresh lemony taste but, as I said earlier, I don’t routinely keep lemons in so that doesn’t work for a ‘spontaneous’ cake.

The Recipe:

For the cake:

125 g /½ cup/4 oz soft margarine*
1 tsp baking powder
2 large eggs
250 g/1 cup/8 oz granulated or caster sugar**
190 g/1½ cups/6 oz all-purpose (plain) flour
2 tsp lemon juice, made up to 125 ml/½ cup with milk

* I use soft margarine for this, which makes it quick to mix, but hard margarine or butter, softened to room temperature, would work too.

** I used North American granulated; caster sugar might be a better choice in the UK.

Preheat the oven to 350˚F/180˚C/Gas 4. Grease and line a 7″ round loose-bottomed cake tin. Note that this recipe would also work, doubled, in a Bundt pan.

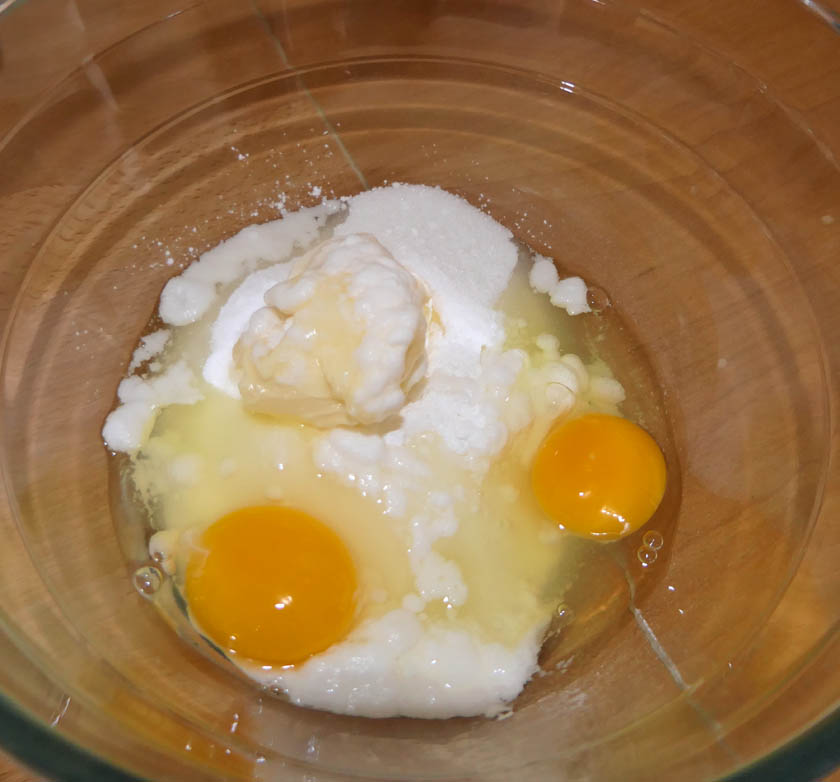
Place the margarine, eggs, sugar and baking powder (and zest of 1 lemon, if using) in a bowl and beat until creamy.

Gradually add the flour and the lemon juice mixed with milk.

beat until flour is incorporated. It will form a soft dropping consistency. Transfer to the prepared tin and then place in the oven for 30-40 minutes. Check for done-ness with a skewer, cake is ready when the skewer comes out clean. Transfer the cake, in its tin, to a wire rack. Use the skewer to insert multiple holes into the top of the cake.

Make a glaze by mixing ½ cup sugar with lemon juice until you achieve a runny consistency. Note that this can be granulated sugar, if you like a granular texture to your glaze, or icing sugar (powdered/confectioner’s sugar). I used granulated sugar. Pour some of the glaze on the top of the cake, whilst still in the tin, using a spoon to ‘feed’ the glaze into the holes. Leave to cool in the tin, 10 minutes.

Remove the cake from the tin and place on a wire rack to cool completely. Place a flat plate under the rack to catch any drippings, and then pour the remainder of the glaze over the cake, allowing it to drizzle down the sides.

Allow to cool completely, before cutting

The cake has a very light texture and a light lemon taste. The glaze adds a lot of extra lemon taste. Its a really nice ‘cut-and-come-again’ everyday cake and very quick to make. It would go very well with a high tea.

Variation on a theme-Pear and Mincemeat Cake

Regular readers may remember that I like using mincemeat (the Christmassy fruit mixture, and not actual meat) in cakes. One of my favourite ‘regular’ cakes is a ‘mincemeat cake’ that is a very nice, moist light fruit cake (see Cut-and-Come-Again-Mincemeat Cake). In fact, I made one of those a few weeks ago and still had half the jar of mincemeat in the fridge. Clearly it needed using up.

I also had a couple of pears in the fruit basket. I don’t buy them often, but I occasionally have a fancy for one. I’d bought three ‘Bartlett’ pears-now these are a very firm pear normally, so I was surprised at the texture of these pears, I suspect they are not really Bartletts. Anyway, two remained and because they were quite soft-textured, they also needed eating up. So, something with pears and mincemeat, then.

By the way, I recently read somewhere that ‘meat’ used to mean any food in mediaeval English, which makes more sense of ‘mincemeat’ not actually containing any meat, as we know it. Shows how long this mixture of dried fruits and peel has actually been around, I guess.

I actually had a recipe in my collection, a BBC Good Food one that I’d saved from some time ago. However, when I looked at it, it involved things I didn’t have in my stores, like ground almonds and golden caster sugar. Still, I thought, what if I combined my usual mincemeat cake recipe with bits of this one, namely the pear ‘filling’? Why not give it a go!

The recipe:

2 pears, peeled and chopped
1½ tbsp. brown sugar or brilliant yellow sugara
1½ tbsp. water
¼ tsp mixed spice
125 g/ 4 oz soft margarine
125 g/4 oz soft brown sugar
2 large eggs
220 g/7 oz self-raising flour
A little milk, if needed
½ jar mincemeat (600-700g jar)

aI used brilliant yellow sugar, but golden caster sugar would be a good choice in those places that have it.

Preheat the oven to 300˚F/300˚F convection/160˚C/140˚C fan/Gas 3

Grease and line a 7 inch loose-bottomed cake tin and set aside.

Peel, core and chop the pears into pieces about the size of your thumb. Place the pear pieces into a small non-stick frying pan or skillet. Add brown sugar (or brilliant yellow sugar or golden caster sugar, as available) and water. Cover the pan and cook over medium heat for 10 minutes or until just tender. There should be no liquid remaining. Stir in the mixed spice (pumpkin spice would work if mixed spice isn’t available) and set aside to cool. I put mine in the freezer because I didn’t want to wait too long. I think my pears, being that they were already pretty soft, are a little softer than ideal. A firmer pear would probably work better.

Place the brown sugar and soft margarine into a bowl and beat until light and fluffy.

Beat in the two eggs and then the flour. The batter should have a ‘dropping’ consistency. If needed, add a little milk to soften the batter, although I usually find it is soft enough without. Stir in the mincemeat.

Place half of the cake mixture into the tin, then add a layer of pears, before topping with the remainder of the batter. Sprinkle over some brown sugar.

Bake for 1 hr -1 hr 30 minutes. Check the cake after 1 hour. It is ready when a skewer or cake tester comes out clean. Remove from the oven and leave to cool, in the tin, for 10 minutes. Then remove the tin and parchment paper and complete cooling on a wire rack.

Well, that seemed to work. The cake was firm, with a nice crumb and a soft fruity layer. It sliced very nicely, too. It worked well as a cake with afternoon tea, and I suspect would also be good warm, with custard or cream. Cake and pudding in one, can’t beat that!

Just a reminder that some of my earlier baking exploits have been compiled in ‘The Pudding Queen’ ebook and paperback, available from Amazon. Includes the Mincemeat Cake!

The Pudding Queen-in print

One day Mark said to me ‘why don’t you do a recipe book?’ After all, I had all these recipe blog posts, maybe it would be nice to bring them all together. So I did.

We’ve published quite a number of books through Amazon, now. Mostly Mark’s novels, bird guides and birding memoirs, so we are quite used to the process. I usually am involved as editor, illustrator, layout person, etc. It was quite different as ‘author’ with Mark as ‘editor’. Still most of my copy was already published on the blog, I just needed to export it, update and lay it out. We were aiming for a paperback, 9 x 6 inch in size, and an eBook, with full-colour illustrations. That would put the price up a little, so we chose to use the standard quality printing. It was fine.

I chose 34 of the recipes on the blog, covering ‘everyday’ cakes, celebration cakes, cheesecakes, biscuits and traybakes, hot puddings, cold desserts and teabreads. It includes a set of ‘handy hints’ from my years of converting recipes from Across the Pond and Down Under to work in North America. It was definitely fun to put together.

Printing in colour does increase the price a bit-we put the paperback price as low as possible but it still came out to $16.00 CDN, The eBook is a lot more affordable at $1.99 CDN. Still, it’s something to hold your own book in your hands, even if we did have to buy our own copies!

And what was Mark’s input? He’s the Chief Tester, of course!